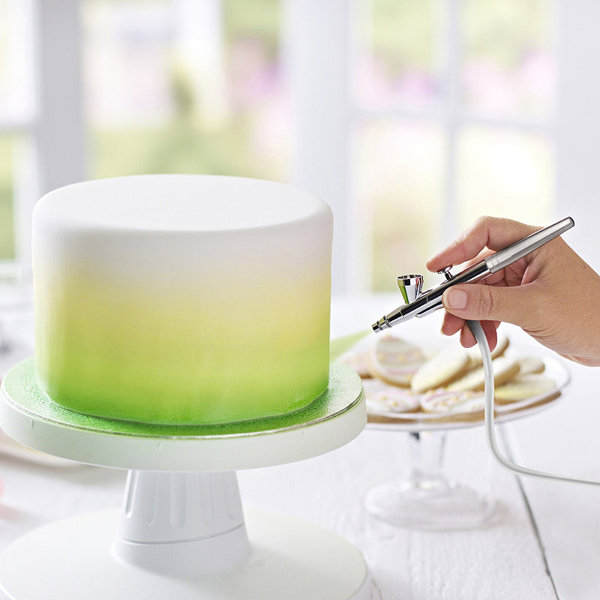
Airbrush for cakes is a fun concept, and it speeds up the decorating process. You can create beautiful cakes with colorful details in a fraction of the time it takes to decorate one by hand. With so many airbrush products on the market, it can be intimidating as you shop for products. I have some wonderful information to share with you to help you evaluate your needs and select the best product!
Some of the information I will share with you includes:
· Evaluating airbrush suppliers
· Selecting an airbrush kit
· Buying an airbrush kit with a compressor
· Finding a product to fit your budget
· Learning to airbrush for cakes
· Proper storage and cleaning
Evaluating Airbrush Suppliers
I learned the hard way, not all airbrush suppliers offer the same quality of product. This was a frustrating lesson for me. You will find it helpful to invest time researching products before you buy any of them. Do you need a compressor or not? That influences what you look at. I use one because it gives me complete control over the amount of air that flows through the nozzle to complete my designs.
Some of the higher-priced airbrush kits don’t offer you anything more than one you can buy for significantly less. Some of the brands have a terrible reputation while others have plenty of positive feedback. It is worth it to look at reviews from customers so you can evaluate the pros and cons of a system before you buy it. Many of them are amazing, but others have design flaws. A few of them didn’t last me more than a few months, and I would have been better off paying for a better product. The right product will have an impact on your finished cakes!
Selecting an Airbrush Kit
It has been my experience various airbrush kits come with different items in them. While it is less expensive to buy a kit than individual items, make sure it contains all you need. I have purchased additional items including stencils to add to my airbrush kit. There are plenty to choose from, and it depends on what you plan to create. Some of them include liquid colors and others require you to buy those separately.
Before you select any airbrush kit, read the description of the product. This will share with you all the items included. If the main items you need are missing, that kit may not be a good investment. The goal is to find something that offers you plenty of value to get started so you can airbrush cakes successfully.
In particular, when purchasing airbrush sets, please be careful to select food-grade standard ones. This means that all parts of the airbrush must meet the standards of touchable food. For example, the Bakerydeco airbrush set is especially for cake decoration and comes in compressors and portable models. All components of Bakerydeco airbrush meet food-grade standards and have passed CE, LFGB, FDA, and ROHS tests. There are many airbrush sets on the market that are used for graffiti and industrial purposes, which may not meet the requirements of contact with food. This is very important when you are shopping for an airbrush set.
Buying an Airbrush Kit with a Compressor
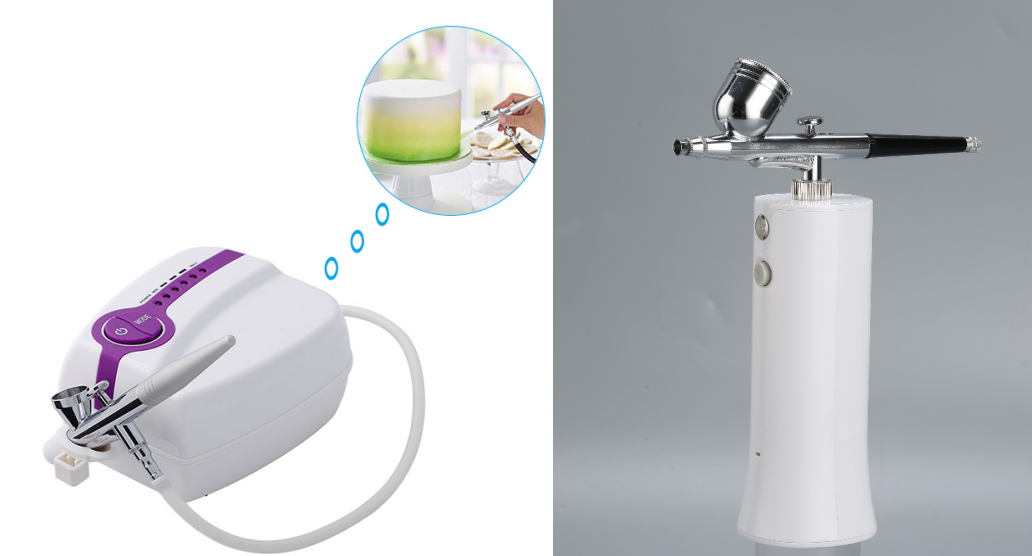
I strongly recommend an airbrush kit with a compressor. That is the main item you need to do this type of cake decorating well. If you buy the compressor separately, it may not be compatible with the airbrush kit you purchased. When the compressor comes with it, you know from the start all those items will work together correctly.
The best airbrush kits with a compressor have high, medium, and low airflow settings. Make sure you confirm the product you have your eye on offers this so you have complete control over how much air you allow to flow through when you work on your cake decorating project. I have found some of these compressors are very noisy, and that is distracting when I work on cakes. It is a good idea to read reviews about the noise it will make before you purchase it. I prefer one with a gentle hum to it. The size of the compressor will influence the cost and what you can do with it.
Or you can choose the portable airbrush model. That is a combination spray pen and compressor. Built-in battery, which can be utilized in any situation as long as it is fully charged. At the same time, it is small, convenient, and easy to carry, and is currently a very popular style on the market.
Finding a Product to Fit your Budget
Spend some time looking at your budget. How much can you justify spending on a kit to airbrush for cakes? Do you plan to use it once for a special cake or will this be something you use often? My general rule of thumb is I will spend more on products if I plan to use them often, and cake decorating is something I do several times per week! Remember, you don’t need to buy the most expensive one to get a great airbrush kit!
On the other hand, don’t buy the cheapest one out there! You may think you are saving money, but a cheaply made item isn’t going to work well. It isn’t going to hold up, and you will have to invest more money to buy a different brand. I recommend buying something within your price range after you carefully research it. Then you can buy with confidence and know the product, what it includes, and any concerns other consumers found with it.
Learning to Airbrush for Cakes
Don't be intimidated by the process of airbrushing for cakes! It takes time to learn how to use your airbrush kit. Always read the instructions for the product you buy and practice on paper before you attempt to use the colors on a cake. This will help you learn to control your movements, determine how much airflow you need, and other details.
While the basics of airbrush for cakes are the same, there are differences within each of the products out there. Don't assume you know the information, read the booklet that comes with your kit. This will help you set it up correctly, use it as it was intended, and eliminate the risk of damaging or ruining it because of improper usage.
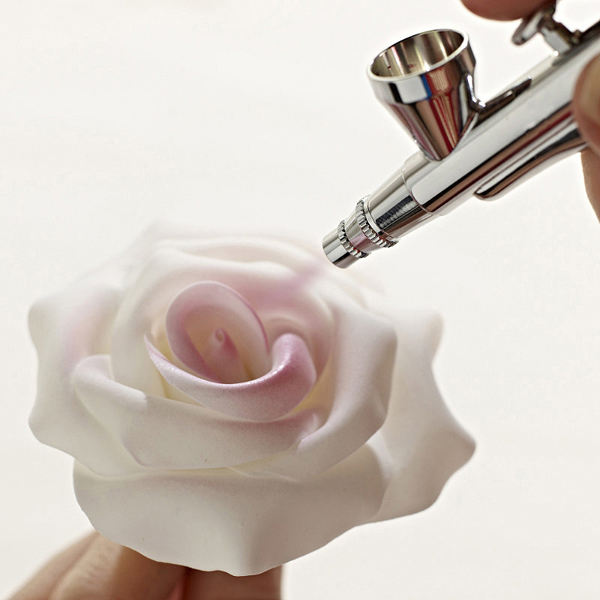
Since I am a visual learner, I watched videos online before I tried to use my kit. Seeing best practices and tips built up my confidence. I was eager to dive in and see what I could create instead of feeling overwhelmed by the process. When you wish to airbrush an entire cake, hold the sprayer at a 45-degree angle. If your goal is to detail areas of the cake, hold it at a 90-degree angle.
Make sure you hold the sprayer about 6 to 8 inches away from the cake for the best results. Being too close is going to distort the desired outcome. As you practice with your airbrush kit, you will identify what is looking how you want it to and what isn’t. This gives you a chance to adjust before you dive in and decorate a cake with your kit.
As your confidence level grows, challenge yourself with new projects. I love trying something new and seeing how it comes out. I use stencils often and encourage you to add them to your kit. I keep mine in a plastic box and I can easily rummage through it and find the items I wish to use for a particular airbrush cake project.
I put some pieces of cardboard on the table and used them to practice on. When I felt confident with how my airbrush kit worked, I then baked a cake to use it on. My work has gotten better and better. I have gotten faster with the process too. I get tons of compliments on how my cakes turn out. Many of the people that see them ask me where I bought the cake. They are blown away when I tell them I made it myself using my airbrush kit with a compressor!
Proper Storage and Cleaning
If you want your airbrush kit and compressor to last, you must take care of the items. Proper storage and cleaning are important to extend the life of it. Information on how to clean the parts and how to store the kit when not in use should be included with the product. Follow the specific instructions for the product you purchased.
Always clean your parts as soon as you are done with the airbrush kit. Don’t leave any liquid in the sprayer as it can ruin it. Put the tip into a bowl of warm water and squeeze the trigger to get anything in the hose out before you put it away. Don’t worry, I have purchased a variety of airbrush kits over the years, and most of them are a breeze to clean up and pack away. Keep all the pieces in one box so you aren’t missing anything the next time you get it out to decorate a cake!
When you buy a quality product, you can count on it to last, if you take good care of it. I have purchased various accessories to use with my kit and keep all those items in my hall closet. It is fast and easy to get them out, sort through them, and select what I want to use. It isn’t difficult to set up the airbrush kit when I am ready to decorate a cake either because I store it well after each use.
Conclusion
I hope you will take your time selecting the best airbrush for cakes kit with a compressor for your needs and budget. It is a great investment, and you will love it for creating beautiful cakes and fun designs. Invest in a quality product you can count on to help you achieve what you had in mind. Allow your creative side to be let loose and enjoy the process. Proper use and cleaning of your airbrush kit will ensure it is something that lasts a very long time!


